How to Scan a Document to PDF on iPhone
Your iPhone already scans paper. Here is how to do it with the tools Apple ships, where those tools stop, and when a dedicated scanner is worth the install.

The short answer
For one page you will send straight away, use the scanner inside Notes or Files. It is free, it is already installed, and it produces a normal PDF. For a stack of paper you will want to find again later, use an app that keeps a library, reads the text on every page and can combine, compress, sign and protect the result.
Method 1: the Notes app
- Open Notes and start a new note. The scanner lives inside the note, not in a separate app.
- Tap the attachment button, then Scan Documents. The camera opens in document mode.
- Hold the phone over the page. The frame snaps to the edges and captures on its own. Tap the shutter if you would rather do it yourself.
- Capture the remaining pages, then tap Save. All the pages land in one scan attachment.
- Tap the scan, then Share, then Save to Files. This is the step that turns the attachment into a PDF file you can send.
Good for: a single document you are about to email.
Watch out for: the scan lives inside a note. If you scan often, your documents end up scattered through your notes rather than filed together.
Method 2: the Files app
- Open Files and navigate to the folder that should hold the PDF. iCloud Drive or On My iPhone both work.
- Tap the more button in the top corner, then Scan Documents.
- Capture the pages and tap Save. The PDF is written straight into the folder you opened.
Good for: filing directly into a folder structure you already use.
Watch out for: what you get is a PDF in a folder. There is no per document toolkit around it, so combining, compressing, signing or password protecting the file is a separate job in another app.
Method 3: a scanner with a library
This is what Paperlane does, and the capture step uses the same Apple VisionKit engine as the two methods above. The difference is everything that happens after the shutter.
- Open Paperlane and tap Scan. The scan button is the widest control on the screen, so it is reachable with a thumb.
- Hold the iPhone over the page. Edges are detected and the perspective is corrected, page after page, in one session.
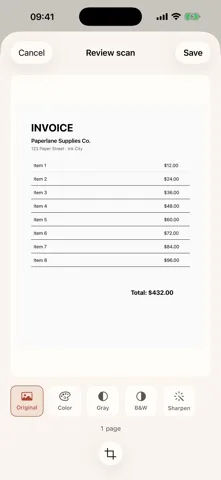
- Pick a page mode on the review screen. Original, Color, Gray, B&W or Sharpen. B&W is the one that rescues faint print.
- Crop if the frame took in too much. The crop editor works on the captured page, before anything is saved.
- Tap Save. The pages are read on the device, an invisible text layer is written into the PDF, and the document is named after the first line that was recognized.
Which one should you use
| What you are doing | Best tool |
|---|---|
| One page, sending it now | Notes or Files |
| Filing straight into iCloud Drive | Files |
| A stack you will need to find again | A scanner with a searchable library |
| A contract to sign and then protect | A scanner with markup and password protection |
| Receipts for a tax year | A scanner with folders and text search |
None of this needs a subscription. Paperlane is free to install and free to scan with, and the toolkit around the PDF is a single $4.99 purchase rather than a monthly bill.
Get Paperlane
Free on the App Store, iOS 17.0 or later. Rated 5.0 out of 5 from 1 rating.